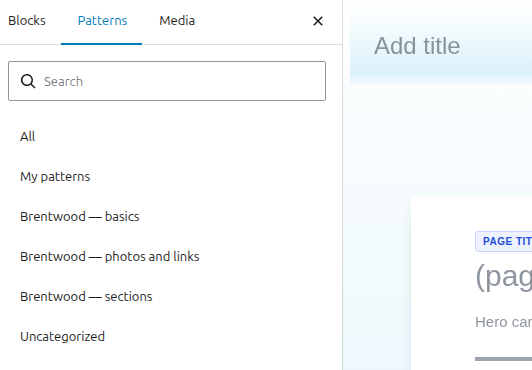
Your website is built out of sections — a photo beside some text, three photo cards in a row, a dark panel with a wide image. Every section style already on the site is saved as a starting point you can drop into a page. You are never building one from scratch.
| Category | What's in it |
|---|---|
| Brentwood — sections | The main designed sections: text beside a photo, dark panels, curved photos, quotes, staff. |
| Brentwood — photos and links | Photo cards, link cards and page-link lists. |
| Brentwood — basics | Plain building blocks: a text section, two columns, a full-width photo, a video, latest news. |
A section arrives filled with placeholder wording — "Section heading", "Replace this with your own text." — and a photo from the site. Replace all three and the section is finished.
That's the whole job. There is no fourth step and nothing to switch on.
Don't look for a second section facing the other way — flip the one you have.

The column widths flip with it, so a wide photo stays wide.
Select the whole section (as above), then click the palette button on the toolbar and pick a swatch: white, light blue, light grey, dark grey, or none.
This is why there aren't separate sections for each colour — one section covers them all.
Select the whole section and click the card button on the toolbar. It adds rounded corners and a soft shadow, the "raised panel" look used across the site. Click it again to remove it.
The curve belongs to the column holding the photo, not to the whole section. Click the photo, click Select parent once so the column is selected, then click the curve button on the toolbar.
Yes — completely. Once a section is on the page it is simply blocks. Add a button, delete a column, drop in another photo, change anything. Nothing is locked, and nothing you do affects any other page.
If clicking selects the wrong thing
A section holds columns, and columns hold the text and photos, so your first click may land deeper or shallower than you meant. Use the Select parent arrow at the left of the toolbar to step outwards, or open List View (the stacked-lines icon, top left) and pick the exact piece from the outline.
Pick by shape, not by colour or styling — those are toolbar buttons once it's on the page.
| You want | Start from |
|---|---|
| Some words next to a photo | Text + photo |
| Words with a photo either side | Photo · text · photo (curved) |
| A bold statement over a big image | Dark panel + wide photo |
| Three photos in a row | Three photos, or Three photo cards |
| Links through to other pages | Three link cards, or Page links |
| A quote from a student or parent | Quote + photo |
| Just text, full width | Text section |
Remember
Trying a section costs nothing. Ctrl + Z (Cmd + Z on a Mac) takes it straight back out, and nothing reaches visitors until you click Update. If a page ends up in a mess, open Revisions on the Page tab and restore an earlier version.